A plastic part can fill correctly, hold its main dimensions, and still fail visual review because one small area immediately shows where the resin entered the mold. Sometimes that mark looks like a tiny bump. Sometimes it looks like a cut gate scar, a shallow crater, or a polished spot that catches light differently from the rest of the surface. On an internal bracket, that may not matter. On a visible housing, a consumer product shell, or a cosmetic cover, that same mark can become the first thing people notice.
That is why gate vestige matters more than many teams expect. In injection molding, the real question is not only whether the part can be molded. The real question is whether the part still looks acceptable after the gate breaks away, after trimming, and after the surface is inspected under normal lighting. A gate vestige that seems minor on a drawing can turn into a sample approval problem as soon as real parts are on the table.
This is also why gate vestige should not be treated as a cleanup issue that can always be solved later. Some marks can be reduced with better trimming or process control. Others are tied much more directly to gate type, gate location, wall geometry, and the visual expectations of the part itself. Once those decisions are locked, the room for improvement becomes much smaller.
What Is Gate Vestige?
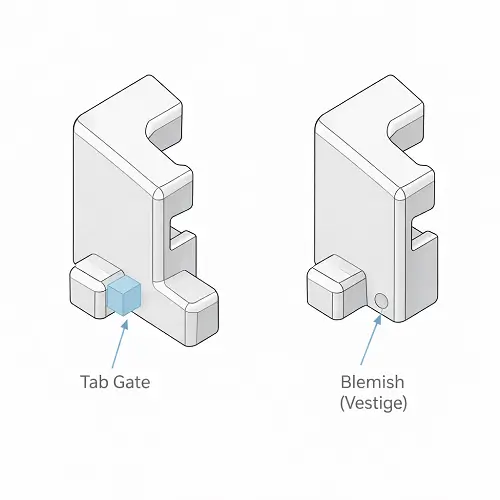
Gate vestige is the visible or physical remnant left on a molded part after the gate separates from the part. Depending on the gate style and the way the part is de-gated, that remnant may appear as a small raised point, a trimmed flat spot, a circular witness mark, or a shallow scar where the melt entered the cavity.
This is a normal result of the molding process. Resin has to enter the cavity somewhere, and once the part is formed, that connection has to be removed. The place where that separation happens is where the vestige remains. The real issue is not whether a gate vestige exists at all. The real issue is how large it is, how visible it is, and whether it sits on a surface that can tolerate it.
On some parts, the vestige is barely worth discussing. On others, especially cosmetic plastic parts, even a very small gate mark can be enough to trigger rework, a gate relocation discussion, or a change in finish strategy. That is why gate vestige is not just a molding detail. It is part of the final visual quality of the product.
Why Gate Vestige Matters on Cosmetic Plastic Parts
A gate vestige becomes much more important as soon as the molded surface becomes part of the product’s visual value. A hidden internal feature can tolerate a much more obvious gate mark than the front face of a hand-held device, a visible enclosure wall, or a polished outer shell. Once the gate remnant lands on a customer-facing surface, it stops being a small technical leftover and starts affecting how finished the product looks.
High-gloss plastic parts are especially sensitive. Light reflects cleanly from the surrounding surface, but the gate area interrupts that reflection. Even if the vestige is small, the eye catches it quickly because the rest of the surface is trying to look smooth and continuous. Matte or textured surfaces can be slightly more forgiving, but a visible gate mark can still stand out if it sits in the wrong place or breaks the texture in an obvious way.
This is why gate vestige often becomes a sample-stage issue rather than a shop-floor issue. The part may be functionally fine. The mold may run well. The gate may trim cleanly enough from a process standpoint. But once the sample is held under inspection light, the gate location and the remaining mark can become unacceptable for the intended product.
Why Does Gate Vestige Happen?
Gate vestige happens because the molded part has to separate from the gate after filling and packing. The gate is the channel that allows molten plastic to enter the part. Once the part has formed, that connection is no longer needed, so it breaks or is cut away. What remains depends on how that separation happens and what kind of gate was used in the first place.
Some vestiges are mainly shaped by gate geometry. A larger gate, a thicker gate, or a gate with a less favorable break-off condition can leave a more obvious mark. Some are shaped by material behavior. Certain resins break more cleanly than others, while some stretch, string, or leave a rougher trimmed area. Some are affected by de-gating method. Automatic de-gating may leave a different result from manual trimming, and both can look different again under different surface finishes.
Location matters just as much. A gate vestige on a hidden edge is usually tolerated much more easily than the same vestige on the center of a visible face. That is why the mark is never only about gate size or trimming quality. It is also about where the mark lives on the part and how much attention that area attracts.
How Gate Type Affects Gate Vestige
Not all gate types leave the same kind of vestige. This is one of the most practical points in gate design, because gate type affects not only filling and packing, but also how cleanly the part separates and what kind of mark remains on the finished surface.
An edge gate often leaves a relatively obvious trimmed mark because the resin enters from the side and is usually cut or broken away at the edge of the part. That may be acceptable when the gate is placed on a hidden or secondary surface, but it is rarely ideal for a highly cosmetic area.
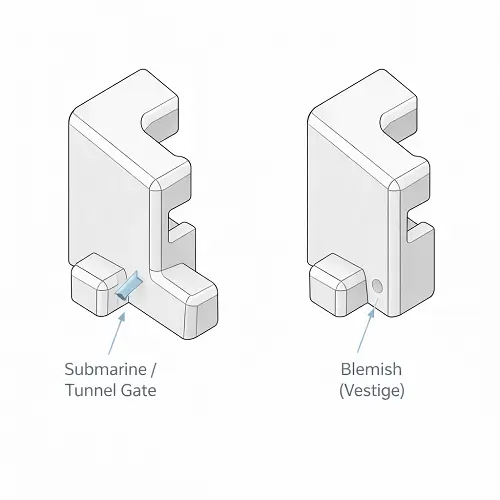
A tunnel gate or submarine gate can reduce the need for manual trimming and may help keep the visible gate mark away from the most important face of the part. But it does not guarantee an invisible result. Depending on the resin and the geometry, the break-off can still leave a noticeable vestige or a localized witness area.
A pin gate often leaves a smaller, more concentrated mark, which can be useful on parts where a compact gate point is easier to hide than a larger edge trim. But small is not the same as invisible. On a glossy or tightly controlled cosmetic surface, even a small pin vestige can become the main visual defect.
A direct sprue gate usually leaves the most obvious mark because the material enters through a larger central connection. That may make sense on some functional parts, but it is usually a poor fit for a visible cosmetic area unless the gate location is intentionally hidden or later covered.
How different gate types usually affect vestige
| Gate type | Typical vestige visibility | What it usually means in real parts |
|---|---|---|
| Edge gate | Medium to high | Easy to place on hidden edges, but usually leaves a more obvious trimmed mark |
| Tunnel / submarine gate | Low to medium | Can improve appearance by moving the mark away from the main face, but break-off still needs to be controlled |
| Pin gate | Low to medium | Small concentrated mark, often easier to hide, but still very visible on glossy cosmetic parts |
| Fan gate | Medium | Good flow distribution, but the entry area can still leave a wider visible witness after trimming |
| Direct sprue gate | High | Usually the most obvious vestige and rarely preferred for visible cosmetic faces |
This does not mean one gate type is always best. It means the gate mark should be judged together with the part’s appearance requirement, not separately.
Gate Vestige vs Gate Blush: What Is the Difference?
These two are often mixed together because they both show up near the gate area, but they are not the same problem.
Gate vestige is the physical remnant or visible scar left behind where the gate separates from the molded part. It is usually something that looks like a point, scar, trimmed nub, or entry mark. It is tied directly to how the gate was designed, how it breaks away, and how it was trimmed.
[Gate blush] in injection molding is different. It usually refers to a local surface appearance change near the gate area, such as whitening, gloss disturbance, or stress-related haze. It is more of a surface condition than a physical remnant. A part can show gate blush without having an objectionable vestige, and it can show a clear vestige without much blush.
That difference matters because the fixes are not always the same. A gate blush issue may push the review toward shear, local stress, or flow behavior. A gate vestige issue usually pushes the review toward gate type, gate size, gate location, de-gating strategy, and whether the mark sits on the right surface in the first place.
Why Gate Vestige Is More Visible on Some Parts Than Others
The same gate mark can look minor on one part and completely unacceptable on another. That difference usually comes from surface finish, lighting, part size, and visual expectations.
High-gloss surfaces make gate vestige more obvious because the surrounding area reflects light cleanly. A small interruption in that reflection becomes easy to see. On a textured or matte part, the same vestige may still exist, but it usually does not jump out as quickly because the surface already breaks up reflected light.
Part scale matters too. On a larger industrial housing, a small gate remnant near an edge may barely be noticed. On a small consumer product shell, that same mark can dominate the visual impression because it occupies a larger share of the visible area. Color can make a difference as well. Some marks show more clearly on dark glossy colors, while others become more noticeable on lighter uniform finishes.
This is why gate vestige should never be judged only by size. A small mark in the wrong place can be more damaging than a larger mark in a better location.
How to Reduce Gate Vestige in Injection Molded Parts
Reducing gate vestige usually starts with accepting a simple truth: some marks can be made smaller, but not every gate can be made visually invisible. The most effective improvements usually come from choosing a better gate strategy rather than trying to rescue a bad one after the tool is already built.
The first lever is gate type. If the current gate leaves a large or visually aggressive remnant, a smaller or differently breaking gate may improve the result. The second lever is gate location. A visible gate mark does not always need a new gate type if the real problem is that the mark sits on the wrong surface. Moving the gate to a less sensitive area often solves more than trying to perfect the trimming of a poorly placed gate.
Gate size also matters. A larger gate may help filling and packing, but it can leave a larger vestige. A smaller gate may reduce the mark, but only if filling and packing still remain acceptable. This is where gate design becomes a balance rather than a simple appearance preference.
The trimming strategy matters too. Automatic de-gating, manual trimming, and secondary cleanup do not leave the same visual result. Some parts can tolerate a slightly more visible gate if the mark lands in a safe area. Others need a cleaner break because even a small trimmed witness will be too obvious.
Surface finish should be reviewed honestly as well. A polished visible face will make vestige more obvious. A more forgiving matte or textured finish may reduce how strongly the gate area stands out. That is not a substitute for good gate design, but it can change what is visually acceptable.
A practical reduction checklist
| What to review | Why it matters |
|---|---|
| Gate type | Different gate styles leave different break-off conditions and different mark shapes |
| Gate location | A visible mark on the wrong face is often a bigger problem than the size of the mark itself |
| Gate size | Larger gates can improve fill but often leave larger or rougher vestiges |
| De-gating method | Automatic break-off and manual trimming do not leave the same cosmetic result |
| Surface finish | Glossy surfaces usually make vestiges more obvious than matte or textured surfaces |
| Part use and visibility | A functional hidden part and a consumer-facing housing should not use the same cosmetic standard |
When Gate Vestige Is a Design Issue, Not Just a Processing Issue
A lot of teams first treat gate vestige as a trimming or process problem. Sometimes that is fair. But many gate vestige issues are actually design issues in disguise.
If the mark stays too visible because the gate sits on a primary cosmetic face, the problem is not only the trimming method. If the chosen gate type naturally leaves a more obvious remnant than the part can tolerate, the problem is not only machine settings. If the part requires a near-perfect visible surface but the geometry gives the mold no practical place to hide the gate, the issue is no longer just a production detail. It is a design and DFM problem.
This matters because the response changes depending on the real cause. A process issue invites tuning. A design issue invites a different gate strategy, gate relocation, or a more realistic appearance target. Confusing those two usually wastes time because the team keeps trying to polish a result that the current gate concept was never capable of delivering.
A Realistic DFM Scenario: A Clean Part With an Unacceptable Gate Mark
A small consumer electronics housing is a good example. The part fills well, dimensions are close, and the general surface quality looks acceptable. There is no major flash, no severe sink, and no obvious molding failure. On paper, the sample looks successful.
Then the cosmetic review starts. The gate vestige is sitting near a visible side edge, and although the mark is not large, it catches light immediately. The part is technically molded well, but the gate area keeps drawing attention. Trimming improves it slightly, but not enough to change the overall impression.
At that point, the project is not dealing with a bad molded part. It is dealing with the wrong gate strategy for the visual requirement. The issue is not that the part was molded badly. The issue is that the chosen gate location and finish combination never gave the sample a good chance to pass cosmetic review cleanly. That is exactly the kind of situation where gate vestige becomes a DFM decision, not just a molding-floor detail.
What Should Be Confirmed Before Finalizing Gate Location and Finish?
Before the gate strategy is locked, a few questions should be answered clearly. Which faces are truly cosmetic. Which surfaces can tolerate a gate mark and which cannot. Will the vestige sit on a polished, high-gloss, or highly visible area. Can the selected gate type break away cleanly enough for the target finish. Is manual trimming acceptable, or does the part need a cleaner automatic break.
These are not small questions. They affect sample approval, surface quality, and how much cleanup the project will tolerate. A gate mark that looks acceptable on a hidden edge may be unacceptable on a front-facing enclosure wall. A finish that looks premium in concept may become too unforgiving once the gate mark is judged under inspection lighting.
That is why gate location and finish should be reviewed together, not as separate decisions. The acceptable vestige size is never judged in isolation. It is judged against where it lands and what kind of surface surrounds it.
Conclusion
Gate vestige is not just a small mark left behind after molding. On visible plastic parts, it can affect sample approval, cosmetic quality, and whether the chosen gate strategy still makes sense for production. Some gate marks can be reduced through better trimming and process control, but others are tied more directly to gate type, gate location, and part design.
That is why gate vestige should be reviewed early, especially on cosmetic parts. A molded part can be dimensionally correct and still be commercially wrong if the gate mark lands where the product cannot tolerate it. Choosing the right gate type and the right gate location makes sample approval much easier than trying to rescue a poor visual result after the tool is already built.
For projects with visible housings or strict appearance requirements, it is worth checking the gate strategy before tooling release. Send your drawings to JeekMould for a DFM review and quote if you need help with gate placement, visible gate marks, or plastic injection molding service for custom parts.
FAQs
What is gate vestige in injection molding?
Gate vestige is the visible or physical remnant left on a plastic part after the gate separates from the molded part.
Why does gate vestige happen?
It happens because resin has to enter the part through a gate, and once molding is complete that connection must break or be trimmed away, leaving a mark behind.
What is the difference between gate vestige and gate blush?
Gate vestige is the physical gate remnant or scar. Gate blush is usually a surface appearance change such as whitening or gloss disturbance near the gate area.
Which gate type leaves the smallest vestige?
There is no universal answer, but pin gates and some tunnel gates often leave smaller, more concentrated marks than larger edge or direct sprue gates. The best choice still depends on part geometry and cosmetic requirements.
How can gate vestige be reduced on cosmetic parts?
It can often be reduced by choosing a more suitable gate type, moving the gate to a less visible area, controlling gate size, improving de-gating strategy, and matching the surface finish to the visual goal.