A molded part can look simple in CAD and still hide one of the most fragile decisions in the entire mold. Very often, that weak point is not the main cavity, the runner, or even the gate. It is a small steel-to-steel sealing area that has to block plastic exactly where the mold cannot afford leakage. That is the role of a shut off.
In injection molding design, shut off features are easy to underestimate because they usually occupy a small area on the drawing. They do not look dramatic. But once the mold starts running, a weak shut-off can become the reason a tool flashes, wears too quickly, damages an edge, or needs more maintenance than anyone expected. A shut-off that looks acceptable in section view may still be too thin, too long, too exposed, or too weakly supported for real production.
That is why shut off injection molding design should never be treated as a minor detail. A good shut-off helps the mold seal, protects local geometry, and keeps part quality stable. A bad one usually shows up later as a “small” problem that never stays small.
What Is Shut Off in Injection Molding?
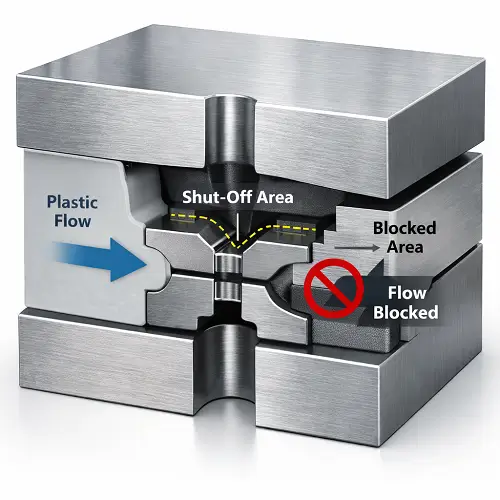
A shut off in injection molding is a steel-to-steel sealing feature inside the mold that blocks molten plastic from flowing into an unwanted area. When the mold closes, one steel surface presses against another and creates a controlled barrier. That barrier allows the mold to form features that cannot be created by a simple open cavity alone.
In practical mold design, shut-offs are used to create or protect local openings, edges, windows, slots, and blocked-off spaces without letting resin leak into the wrong region. The shut-off is not just touching steel. It is sealing against pressure.
That distinction matters. If the contact is weak, plastic will eventually find the gap. If the contact is stable, the mold can hold shape where it needs to, even in more difficult geometry.
A good way to think about it is this: a parting line separates the main mold halves, but a shut-off controls a local area where the mold must close tightly enough to stop flow. The function is local, but the consequences can affect the whole tool.
Why Shut Off Matters More Than It Looks on a Mold Drawing
On a mold drawing, a shut-off often looks like a narrow angled edge or a small contact face. That can make it feel secondary. In production, it is not secondary at all.
A shut-off area may control whether a window edge stays clean, whether a side opening flashes, whether a cosmetic cutout remains sharp, or whether a local steel feature survives repeated cycles without damage. The mold is depending on that area to keep sealing under injection pressure again and again.
This is why shut-off design has a direct effect on more than one problem at once. It can influence flash, wear, edge quality, maintenance frequency, and even whether a mold remains stable as production continues. A weak shut-off rarely fails in only one way. It usually starts with a small symptom and then grows into a larger pattern.
That pattern is one reason experienced mold designers look at shut-offs with more caution than the geometry alone might suggest. If a local feature seems easy on the part but creates a fragile steel condition, the part may be simple while the mold is not.
Where Shut Off Features Are Commonly Used in Injection Molds
Shut-off features appear in many molds because they solve very practical geometry problems. They are commonly used around openings, windows, slots, side cut features, interrupted wall sections, and other local details where plastic must be blocked from entering a region that remains open in the final part.
They also show up near visible edge transitions, especially where the product shape includes local breaks that cannot be formed by a straight cavity wall alone. In some molds, a shut-off makes it possible to avoid a more complicated mechanism. In others, it is simply the only practical way to define a local feature cleanly.
This is why shut-offs are not rare or special-case details. They are part of normal mold design. What changes from project to project is how aggressive they become. A short, well-supported shut-off can be very safe. A long, thin, highly loaded shut-off can become one of the biggest risks in the tool.
Why Poor Shut Off Design Causes Flash
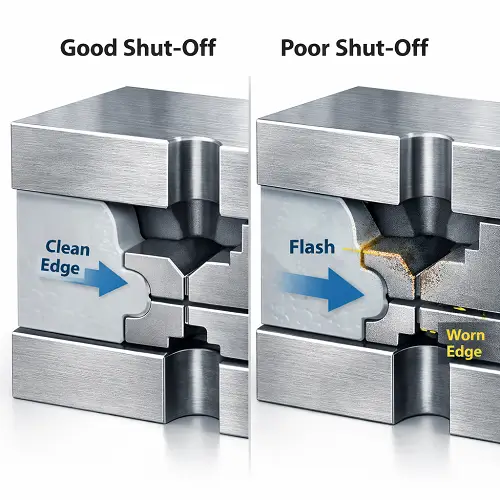
Flash is one of the most common signs that a shut-off is not doing its job well enough. When the sealing surfaces cannot hold pressure consistently, molten plastic begins to enter a gap that should have stayed closed.
At first, the flash may be light. It may only show in one local area, and it may disappear temporarily with process adjustment. That often misleads teams into treating it as only a machine-setting problem. But if the root cause is shut-off weakness, the flash usually returns, especially in the same location.
This happens because the shut-off is being asked to resist pressure with insufficient support, too little steel, too much length, or too much sensitivity to alignment. The mold may still close. The part may still form. But the local sealing condition is not strong enough to remain stable under repeated production conditions.
That is why reducing pressure or increasing clamp force does not always solve the problem in a lasting way. If the shut-off design is weak, the mold is still carrying that weakness. The machine may only be helping delay when it becomes visible.
Why Shut Off Surfaces Wear Out in Production
A shut-off does not only have to seal once. It has to keep sealing over repeated cycles, repeated closing, repeated injection loads, and repeated maintenance intervals. That is why wear becomes one of the most important long-term concerns.
When a shut-off area is too sharp, too thin, or too weakly supported, the steel contact begins to lose stability over time. Edges round off. Contact faces become less precise. Small gaps become easier to form. Once that starts, flash becomes easier to trigger and edge definition becomes harder to protect.
This is also why some molds appear acceptable during early trials and then become troublesome later. The first shots may look clean enough, especially if the shut-off is still fresh. But the design may not be robust enough for actual production life. In those cases, the real problem is not whether the tool can run. It is whether it can keep running without the shut-off becoming a maintenance burden.
Shut-off wear is especially important on visible parts. A tiny amount of wear in the wrong place can turn a clean edge into an inconsistent one long before dimensions appear badly out of control.
What Makes a Shut Off Area Risky?
Not all shut-offs carry the same level of risk. Some conditions make trouble much more likely even before the mold is built.
A shut-off becomes riskier when it is very thin, very long, poorly supported, or located in a region that sees strong pressure during filling and packing. A shut-off is also risky when it sits on a feature that must remain visually sharp, because even slight wear or flash becomes much easier to notice there.
Poor alignment sensitivity is another warning sign. If the shut-off depends on a delicate line of contact staying perfect across repeated cycles, it is more vulnerable than a broader, better-supported sealing region. A feature may look technically possible in CAD and still be too fragile for real production use.
These are the kinds of conditions that deserve more DFM attention:
| Risk Factor | Why It Creates Trouble |
|---|---|
| Thin shut-off edge | Less steel support, easier wear and deformation |
| Long shut-off length | Harder to keep stable and aligned over time |
| High-pressure flow near shut-off | More load on the sealing area |
| Cosmetic edge nearby | Even small wear or flash becomes highly visible |
| Weak steel backing | Contact face loses stability faster |
| Tight alignment dependence | Small mold movement creates bigger local failure |
The most useful review question is not “Can this shut-off be made?” The better question is “Will this shut-off still behave well after repeated production cycles?”
Shut Off vs Parting Line: What Is the Difference?
These two are related, but they are not the same thing.
A parting line is the main separation where the mold halves meet and then open. It is a global mold boundary and usually leaves a visible seam on the part. A shut-off is more local. It is a steel-to-steel sealing feature used to block flow in a specific region.
A part can have a normal parting line and also rely on shut-off features in other areas of the mold. In fact, many shut-offs sit near geometry that people casually assume is “just parting line behavior,” when in reality the steel contact there is doing much more than closing the mold.
This difference matters when diagnosing problems. A visible seam along a main mold split is one thing. Repeated local flash at a small opening or delicate edge is often something else. Treating a shut-off problem like a generic parting line issue usually leads to the wrong corrective focus.
How to Design a More Reliable Shut Off Feature
A more reliable shut-off usually begins with support. The sealing steel should not feel like a delicate knife edge unless there is a very strong reason for that geometry. The more mass and backing the steel has, the more stable the shut-off tends to remain.
Length should be controlled carefully. Long shut-offs are not automatically wrong, but they should never be treated casually. The longer the sealing region becomes, the more it depends on stable alignment and wear resistance over a larger contact area.
Pressure direction needs attention too. If the melt front is driving directly into a sensitive shut-off, the local steel sees more stress. In some designs, a different gate strategy or a different geometry arrangement can reduce how aggressively the shut-off is loaded.
Visible surfaces deserve extra caution. A risky shut-off placed on or near a cosmetic edge should be judged more strictly than one hidden inside the part. The steel may still seal, but even minor wear or flash will be much less acceptable if the location is highly visible.
A practical shut-off design review usually comes down to a few simple questions:
| Design Question | Why It Matters |
|---|---|
| Is the shut-off steel well supported? | Better support means better long-term stability |
| Is the shut-off too long for the feature? | Long seals are more wear-sensitive |
| Is the area loaded directly by melt pressure? | Strong loading increases risk |
| Is the shut-off near a cosmetic edge? | Small problems become visible faster |
| Will maintenance be easy if wear starts? | Hard-to-access shut-offs become expensive problems |
How to Tell Whether Flash Is a Shut Off Problem or a Process Problem
This is one of the most useful real-world distinctions.
If the flash is truly process-driven, it usually responds in a more predictable way to machine changes. Lower pressure, different clamp settings, or fill adjustments often reduce it consistently. If the flash is tied to a shut-off weakness, the behavior is usually more stubborn. It tends to return in the same local area, especially after some production wear or under only slightly changed conditions.
A shut-off-related flash problem often has these characteristics:
- It appears in the same localized region repeatedly
- It becomes easier to trigger over time
- It does not disappear in a stable way with normal parameter adjustment
- It often sits near a delicate opening, edge, or blocked-off feature
That does not mean every local flash is automatically a shut-off issue. It means repeated local flash should make the shut-off condition a serious suspect, especially if the geometry itself already looked aggressive in the mold review.
When Should Shut-Off Areas Be Reviewed Before Tooling Release?
If a part includes long shut-off features, thin steel conditions, visible cosmetic edges, local openings, or blocked-off regions that must stay clean in production, the shut-off design should be reviewed before tooling release. This matters even more when the shut-off sits in a high-pressure flow path or near a feature that cannot tolerate flash, edge wear, or repeated hand trimming.
In real projects, these are usually the cases that should not be left to trial-and-error after steel is cut. A shut-off may look acceptable in CAD and still become a long-term maintenance problem once the mold begins cycling. That is why early DFM review is often more valuable than trying to rescue an aggressive shut-off after the first trial.
A risky shut-off on a hidden internal feature may still be manageable. A risky shut-off on a visible housing edge is a different decision. Once flash, edge wear, or local damage appears on a cosmetic surface, the problem is no longer only about mold function. It becomes a sample approval problem. That is usually not the kind of feature worth gambling on after tooling starts.
A Realistic DFM Scenario: A Small Shut Off That Creates a Bigger Production Problem
A molded housing with a side opening is a good example. On the part drawing, the opening looks simple and easy to understand. In the mold, the opening edge depends on a local shut-off to keep plastic out of the open area while still forming the surrounding wall cleanly.
The first trial parts may look acceptable. The edge is formed, the opening is there, and the mold appears to be doing its job. Then production begins to reveal the weakness. A light local flash starts appearing on one edge of the opening. It is trimmed and adjusted at first, and the issue looks manageable.
After more cycles, the same area becomes less stable. The flash is easier to trigger, and the once-clean edge no longer looks as sharp. The issue is not random process drift. The issue is that the shut-off was too aggressive for the support and pressure condition. The tool could form the geometry, but it could not protect that region well enough over time.
This is exactly why shut-off review matters. The real question was never only whether the mold could make the feature. The real question was whether it could keep making it cleanly.
What Should Be Reviewed Before Finalizing Shut Off Design?
Before tooling starts, the shut-off should be reviewed from more than one angle.
The steel thickness behind the contact area should be checked honestly. The shut-off length should be judged against alignment and wear risk. The local pressure path should be understood. The surrounding surface visibility should be reviewed, because a fragile shut-off on a hidden feature is very different from a fragile shut-off on a cosmetic edge.
It is also worth asking whether the current shut-off is the most stable solution or simply the easiest one to draw. Some shut-offs look elegant in section view but become expensive once maintenance, flash sensitivity, or cosmetic standards are considered.
A good shut-off review is not about proving that the geometry can close. It is about proving that the mold can live with that geometry over time.
Conclusion
Shut off injection molding design is not a minor tooling detail. It is a reliability decision. A good shut-off helps the mold seal, protects local geometry, reduces flash risk, and keeps part quality more stable over production life. A weak shut-off may still look acceptable in CAD and may even survive early trials, but it usually turns into a larger problem once pressure, wear, and real production cycles begin doing their work.
That is why shut-off design should be reviewed with the same seriousness as gates, venting, and visible surfaces. Small shut-off choices can decide whether a mold stays stable or starts demanding repeated correction.
If your part includes local openings, thin shut-off edges, blocked-off regions, or cosmetic features that depend on steel-to-steel sealing, it is worth reviewing the shut-off design before tooling release. This is especially true for visible plastic housings, parts with tight appearance standards, and mold designs where repeated flash or shut-off wear would be difficult to correct later. Send your drawings to JeekMould for a DFM review and quote if you want to check shut-off risk early and avoid avoidable tooling corrections.
FAQs
What is shut off in injection molding?
A shut-off is a steel-to-steel sealing feature inside the mold that blocks molten plastic from flowing into an unwanted area.
Why is shut off important in mold design?
Because it affects local sealing, flash control, edge quality, wear behavior, and mold stability over time.
Does poor shut-off design cause flash?
Yes. Weak or aggressive shut-off areas often lose sealing stability under pressure, which allows resin to escape and create localized flash.
What makes a shut-off risky?
Thin steel, excessive shut-off length, weak support, high local pressure, and cosmetic sensitivity nearby all increase risk.
How can shut-off problems be reduced?
They are usually reduced by improving steel support, controlling shut-off geometry, reviewing pressure direction, and avoiding fragile shut-offs on sensitive visible features.