
Back pressure in injection molding is easy to overlook because the setting does not push plastic into the mold cavity. Injection pressure handles filling. Holding pressure handles packing. Back pressure works earlier, during screw recovery, while the machine is preparing molten plastic for the next shot.
That early stage matters more than many customers realize. If the melt is not mixed, compressed, dried, or plasticized consistently, the molded part can show color streaks, bubbles, splay, black specks, unstable weight, poor surface consistency, or random defects that are difficult to trace. The mold may be built correctly, and the filling pressure may look reasonable, but poor melt preparation can still create quality problems.
Back pressure is not a setting that should simply be raised or lowered without context. A low setting can leave air, poor mixing, or inconsistent melt density. A high setting can add shear heat, slow screw recovery, or degrade sensitive resin. The right setting depends on material type, screw design, drying condition, barrel temperature, shot size, cycle time, and final part requirements.
JeekMould reviews back pressure as part of the full molding process during mold trials, not as a single number on the machine screen. The goal is stable melt quality, consistent part appearance, and reliable production.
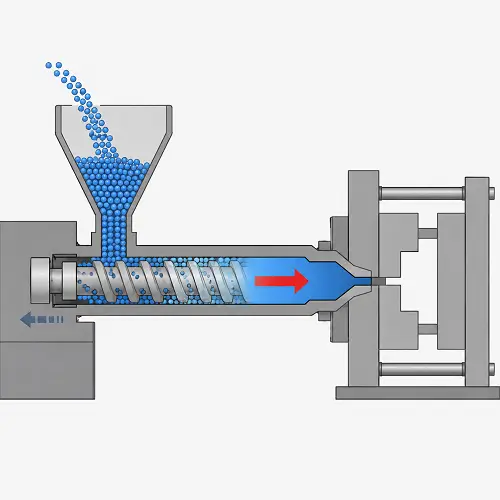
What Is Back Pressure in Injection Molding?
Back pressure is the resistance applied to the screw as the screw rotates and moves backward during plasticizing. After one shot is injected, the screw begins preparing material for the next shot. Pellets enter from the hopper, melt inside the heated barrel, and move forward along the screw flights. As molten plastic builds in front of the screw tip, the screw is pushed backward.
Back pressure resists that backward movement. That resistance makes the screw work the resin more thoroughly. The melt becomes more compacted, better mixed, and more consistent before the next injection stroke begins.
Back pressure is not the same as injection pressure. Injection pressure fills the cavity. Back pressure prepares the melt before injection. That difference is important because some part defects begin before filling starts. A short shot may point to filling pressure, gate design, or venting. Color streaks, bubbles, or unstable melt quality often point toward screw recovery, drying, back pressure, or material handling.
A simple way to explain the difference is this: injection pressure moves plastic into the mold, while back pressure helps prepare better plastic before the shot is injected.
Where Back Pressure Happens in the Injection Molding Cycle
Back pressure happens during screw recovery, also called plasticizing. This stage occurs after injection and before the next shot. The screw rotates, melts the incoming resin, mixes additives or colorants, and builds a measured shot in front of the screw tip.
During recovery, the screw moves backward. Back pressure controls how easily the screw moves back. With low resistance, the screw can recover quickly, but the material may not be compressed or mixed enough. With higher resistance, the screw works the material more, but recovery time, shear heat, and resin stress may increase.
This is why back pressure affects more than one defect. It can influence melt density, color dispersion, trapped air, shot consistency, screw recovery time, melt temperature, and material degradation. These factors can show up in the finished part as streaks, bubbles, splay, black specks, poor gloss, inconsistent dimensions, or unstable part weight.
Back pressure is a plasticizing control, not a direct cavity-filling control.
Back Pressure vs Injection Pressure vs Holding Pressure
Injection molding uses several pressure settings, and each one works at a different point in the molding cycle.
| Pressure Type | Stage of Cycle | Main Function | Common Quality Impact |
|---|---|---|---|
| Injection pressure | Filling stage | Pushes molten plastic into the cavity | Short shots, flash, weld lines, flow marks |
| Holding pressure | Packing stage | Feeds material before gate freeze | Sink marks, shrinkage, dimensions, part weight |
| Back pressure | Plasticizing stage | Controls screw recovery and melt consistency | Mixing, color stability, bubbles, shot consistency |
Injection pressure controls how the cavity fills. Holding pressure controls how the part packs as plastic cools and shrinks. Back pressure controls how the material is prepared before the next filling stage begins.
Confusing these settings often leads to poor troubleshooting. A sink mark near a boss may not be an injection pressure problem. It may involve holding pressure, gate freeze, cooling, or wall thickness. A color streak may not be a mold filling problem. It may involve back pressure, screw speed, material dosing, or poor mixing.
Good process review separates these stages instead of treating every defect as a pressure problem.
Why Back Pressure Matters for Melt Quality
Back pressure matters because plastic must be prepared consistently before injection. A stable melt should have uniform temperature, proper density, good mixing, limited trapped air, and consistent shot volume.
A moderate amount of back pressure can improve melt quality by making the screw work the resin more consistently. The plastic is compressed and mixed more thoroughly. Colorants disperse better. Additives blend more evenly. The shot becomes more repeatable.
This is especially important for cosmetic parts, color-matched products, clear parts, glass-filled materials, and parts where surface appearance matters. A housing with a visible outer surface may show every small change in melt quality. A colored molded part may show streaking if masterbatch does not disperse well. A clear part may show bubbles or haze if drying and melt preparation are not controlled.
Back pressure is not a cure for poor material, bad drying, or worn equipment. It is one part of the plasticizing system. Resin drying, barrel temperature, screw speed, screw condition, residence time, material feeding, and shot size all matter.
What Happens When Back Pressure Is Too Low?
Back pressure that is too low may allow the screw to recover too easily. The screw moves back with less resistance, and the resin may not be compressed or mixed enough before injection.
Poor mixing is one common result. If color masterbatch, regrind, additives, or pellets are not blended evenly, the molded part may show color streaks, uneven gloss, cloudy areas, or shot-to-shot appearance variation.
Low back pressure can also leave air trapped in the melt. Air between pellets or inside poorly compacted material may not be removed or compressed consistently. The result can look like bubbles, splay, silver streaks, or random surface defects.
Shot consistency may also suffer. If melt density changes from one cycle to the next, the part may not pack the same way every time. Part weight, dimensions, and surface quality can drift even when the machine settings appear unchanged.
Low back pressure does not always cause defects by itself, but it can make existing material or plasticizing problems worse.
What Happens When Back Pressure Is Too High?
Back pressure that is too high makes the screw work the resin harder during recovery. This may improve mixing in some cases, but too much resistance can create excessive shear heat and longer recovery time.
Excessive shear heat can damage sensitive materials. Some resins may discolor, release gas, degrade, or form black specks if the melt is overworked. Clear plastics, flame-retardant grades, PVC, POM, some engineering plastics, and color-sensitive materials often need careful control.
High back pressure can also slow screw recovery. If recovery time becomes longer than cooling time, the molding cycle may increase. In production, that can raise part cost and reduce output.
Another risk is hidden degradation. A part may look acceptable during a short trial, but longer production runs can expose yellowing, odor, black specks, or surface instability if the resin is being overheated or held in the barrel too long.
Back pressure should improve melt stability without overheating the resin or slowing production unnecessarily.
How Back Pressure Affects Color Streaks and Material Mixing
Color streaks in injection molding often come from poor material mixing. When masterbatch or pigment is added, the color must disperse evenly through the resin before injection. If the screw recovery process does not mix the material well, the molded part may show visible streaks, swirls, shade variation, or color bands.
Back pressure can help because it increases the work done on the melt during screw recovery. A controlled increase may improve pigment dispersion and create a more uniform shot.
However, back pressure is not the only factor. Masterbatch quality, dosing accuracy, screw design, screw speed, barrel temperature, material drying, and residence time all affect color consistency. If the material feed is unstable or the masterbatch ratio is wrong, raising back pressure will not fully solve the problem.
For color-sensitive parts, JeekMould reviews the full plasticizing condition instead of only changing one setting. Stable color usually requires consistent material feeding, proper drying, controlled screw recovery, suitable barrel temperature, and reasonable back pressure.
How Back Pressure Causes or Reduces Bubbles and Splay
Bubbles, splay, and silver streaks can come from several sources. Moisture, trapped air, poor drying, fast screw recovery, excessive decompression, material degradation, or poor venting can all create similar-looking defects.
Low back pressure can leave more air in the melt because the material is not compacted enough during recovery. A moderate increase may help reduce trapped air and improve melt density.
High back pressure can create the opposite problem. If the material overheats or degrades, gas can form inside the melt. That gas may show up as bubbles, splay, burn marks, silver streaks, or surface defects.
Material drying must be checked before blaming back pressure. Hygroscopic materials such as nylon, PC, PBT, PET, and TPU can absorb moisture before molding. If resin is wet, moisture turns into steam during processing. Back pressure changes may reduce symptoms slightly, but drying is the real correction.
This is why bubbles and splay require a broader review: drying, barrel temperature, screw speed, decompression, back pressure, material storage, and mold venting all need attention.
Why Back Pressure Problems Happen
Back pressure problems usually do not come from the back pressure setting alone. In many cases, back pressure exposes a deeper issue in material preparation, screw recovery, drying, barrel temperature, or process balance.
Poor material mixing is one cause. If the screw recovers too easily with very low resistance, resin, regrind, color masterbatch, or additives may not mix evenly. The molded part may show color streaks, uneven gloss, or random appearance changes.
Trapped air is another cause. Air can remain between pellets or inside poorly compacted melt during screw recovery. Low back pressure, fast screw recovery, poor decompression control, or unstable feeding can make this worse.
Material drying is often involved. Wet resin can create bubbles, splay, silver streaks, and poor surface quality. In that case, changing back pressure may not solve the root cause.
Excessive back pressure creates a different set of problems. The screw works the resin harder, shear heat increases, and sensitive materials may degrade. Recovery time can also become longer, which affects cycle time.
Machine condition also matters. A worn screw, worn check ring, wrong screw design, unstable feed throat, incorrect barrel temperature profile, or inconsistent shot size can create melt-quality problems that look like back pressure problems.
The real question is not only whether the back pressure value is high or low. The real question is whether the material is being dried, melted, mixed, compressed, and delivered consistently before injection begins.
How to Solve Back Pressure Problems in Injection Molding
Solving a back pressure problem starts with the visible symptom. Color streaks, bubbles, black specks, unstable part weight, and long recovery time do not have the same root cause. Adjusting back pressure without checking the rest of the process can make the problem worse.
For poor color mixing or streaks, the first step is to check material dosing, masterbatch ratio, screw speed, barrel temperature, and back pressure. A moderate increase in back pressure may improve color dispersion, but the change should be made gradually while watching melt temperature and recovery time.
For bubbles, splay, or silver streaks, material drying should be checked first. Dryer temperature, drying time, dew point, material storage, and hopper condition all matter. Once drying is confirmed, back pressure and decompression can be adjusted to improve melt compaction and reduce trapped air.
For black specks, yellowing, odor, or material degradation, the process may be too aggressive. Back pressure, screw speed, barrel temperature, residence time, and shot size should be reviewed together. Lowering back pressure may help, but the team also needs to check whether the material is staying too long in the barrel or being overheated by shear.
For unstable part weight or inconsistent dimensions, back pressure should be checked with cushion position, screw recovery, check ring performance, shot size repeatability, holding pressure, and cooling stability. Melt density variation can change how the part packs each cycle.
For long cycle time, back pressure may be too high if screw recovery cannot finish before the cooling stage ends. Reducing back pressure slightly, adjusting screw speed, or reviewing shot size may help, but the correction must not reduce melt quality.
A good correction is gradual. Back pressure should be changed in small steps while checking part appearance, weight, melt temperature, screw recovery time, and dimensional stability. The goal is not the highest back pressure. The goal is the lowest stable setting that produces consistent melt quality without overheating the material or slowing production unnecessarily.
How Material Type Changes Back Pressure Settings
Different plastics respond differently to back pressure. A setting that works well for one resin may damage another material or fail to mix another grade properly.
PP and PE often tolerate moderate process adjustments, but color dispersion and recycled content can still change the best setting. ABS may need stable mixing for surface appearance and color consistency. PC and PMMA require careful control because excessive shear or heat can create optical problems, stress, discoloration, or poor surface quality.
Nylon, PBT, PET, TPU, and other hygroscopic materials require proper drying before back pressure adjustments can be judged. Wet material can create bubbles, splay, and silver streaks no matter how carefully back pressure is tuned.
POM has a narrow processing window and should not be overheated. Flame-retardant materials can be sensitive to shear and residence time. Glass-filled materials need stable plasticizing, but excessive shear can affect fiber length and final mechanical performance.
Back pressure settings also depend on machine type. Some machines display hydraulic pressure, while others display plastic pressure. Screw design, screw diameter, pressure ratio, and machine control method can change how the displayed value relates to actual material behavior.
Settings should not be copied blindly from one machine to another.
Back Pressure, Screw Recovery, and Cycle Time
Back pressure affects screw recovery time. Higher resistance makes the screw work harder and may slow recovery. If screw recovery finishes before the cooling stage ends, the cycle may not change. If recovery takes longer than cooling time, the whole molding cycle becomes longer.
This matters in production because cycle time directly affects part cost. A setting that improves mixing may not be acceptable if recovery becomes too slow. On the other hand, reducing back pressure too much to save time may create streaks, bubbles, or melt instability.
Screw speed also matters. High screw speed with high back pressure can create excessive shear heat. Low screw speed with very low back pressure may fail to mix or compact the melt well enough.
The best setup usually balances screw speed, barrel temperature, back pressure, shot size, recovery time, and material behavior. For high-volume molding, back pressure must support both part quality and cycle stability.
Common Back Pressure Problems and Troubleshooting
Back pressure troubleshooting should start with the visible defect and move backward through material preparation, screw recovery, and process settings.
| Problem | Possible Cause | Practical Correction |
|---|---|---|
| Color streaks | Poor mixing, low back pressure, poor masterbatch dispersion | Check dosing, screw speed, barrel temperature, and raise back pressure gradually if needed |
| Bubbles or splay | Moisture, trapped air, low melt compaction | Confirm drying first, then review back pressure, decompression, and screw recovery |
| Silver streaks | Moisture, trapped air, material overheating | Check drying, melt temperature, back pressure, and venting |
| Black specks | Material degradation, excessive shear, contamination | Review back pressure, barrel temperature, residence time, and purge condition |
| Unstable part weight | Melt density variation, check ring wear, unstable recovery | Check cushion, shot size, screw recovery, back pressure, and check ring condition |
| Long recovery time | Back pressure too high or screw speed too low | Balance back pressure and screw speed without sacrificing melt quality |
| Yellowing or odor | Overheating or long residence time | Reduce shear heat, review barrel profile, back pressure, and residence time |
| Poor surface consistency | Unstable melt temperature or mixing | Check drying, back pressure, screw recovery, material batch, and mold temperature |
The best correction depends on the material and part requirement. Increasing back pressure may improve color mixing, but the same change may overheat a heat-sensitive resin. Lowering back pressure may reduce shear heat, but it may also weaken mixing or leave trapped air in the melt.
Trial changes should be made carefully and verified by part weight, appearance, recovery time, and dimensional stability.
How JeekMould Reviews Back Pressure During Mold Trial
JeekMould reviews back pressure as part of the full molding process, not as a single machine number. During mold trial, the team checks screw recovery behavior, melt consistency, cushion stability, part weight, color appearance, bubbles, splay, black specks, surface defects, and cycle time.
If a part shows color streaks, bubbles, silver marks, unstable weight, or inconsistent surface quality, JeekMould does not adjust back pressure blindly. The team reviews material drying, barrel temperature, screw speed, back pressure, decompression, injection pressure, holding pressure, mold venting, cooling, and gate design together. This helps separate a true plasticizing issue from a drying problem, mold venting issue, material issue, or gate restriction.
For color-sensitive parts, clear plastics, glass-filled materials, hygroscopic resins, and cosmetic housings, melt preparation is especially important. Back pressure may need to be adjusted carefully to improve mixing and shot consistency without creating excessive shear heat or longer cycle time.
JeekMould can also review CAD files, resin requirements, wall thickness, gate location, flow length, and cosmetic surfaces before tooling. Early DFM review helps identify areas where molding pressure, venting, material drying, or melt stability may become production risks.
If a project has color matching requirements, visible surfaces, bubbles, streaks, or uncertain resin behavior, JeekMould can review the part and molding requirements before tooling starts. Upload your CAD files for injection molding DFM feedback, melt-quality risk review, and quotation.
FAQs
What is back pressure in injection molding?
Back pressure is the resistance applied to the screw as the screw rotates and moves backward during plasticizing. It helps control melt density, mixing, color dispersion, and shot consistency before the next injection cycle.
What happens if back pressure is too low?
Low back pressure can lead to poor mixing, color streaks, trapped air, bubbles, splay, unstable shot size, and inconsistent melt quality. The part may show appearance variation even when the mold and injection pressure look acceptable.
What happens if back pressure is too high?
High back pressure can increase shear heat, extend screw recovery time, lengthen the cycle, and degrade heat-sensitive materials. It may also cause discoloration, black specks, odor, or surface defects if the resin is overworked.
Is back pressure the same as injection pressure?
No. Injection pressure pushes molten plastic into the mold cavity during filling. Back pressure works during screw recovery before injection begins. Back pressure prepares the melt, while injection pressure fills the part.
How do you solve back pressure problems in injection molding?
Back pressure problems should be solved by checking the visible defect first. Color streaks may need better mixing. Bubbles or splay may need drying review. Black specks may need lower shear or shorter residence time. Back pressure should be adjusted gradually while checking part appearance, weight, melt temperature, recovery time, and dimensional stability.
Conclusion
Back pressure in injection molding affects the quality of the melt before plastic ever enters the mold cavity. A proper setting can improve material mixing, color consistency, melt density, and shot stability. A poor setting can contribute to bubbles, streaks, splay, degradation, long recovery time, and unstable part quality.
Back pressure should not be adjusted blindly. The right setting depends on material type, drying condition, screw speed, barrel temperature, shot size, cycle time, and part quality requirements. Injection pressure fills the cavity, holding pressure packs the part, and back pressure prepares the melt. All three settings must work together for stable molding.
Back pressure problems are easier to prevent when material behavior, gate design, wall thickness, venting, drying requirements, and process risks are reviewed before tooling. JeekMould can evaluate CAD files, material requirements, and mold design details before production decisions are locked in. Upload your CAD files for injection molding DFM feedback, melt-quality risk review, and quotation.