
Injection pressure is one of the most important process settings in injection molding, but the number on the machine screen does not tell the whole story. A plastic part may need enough pressure to fill thin walls, long flow paths, ribs, bosses, and small details. Too little pressure can leave the part short, weak, or poorly formed. Too much pressure can cause flash, molded-in stress, mold wear, or unstable dimensions.
For customers, the practical question is not only “What injection pressure should be used?” The better question is whether the part design, material, gate layout, mold venting, clamping force, and molding process can work together. Pressure problems often come from the part or mold design before they ever become a machine setting problem.
This article explains what injection pressure means, how injection pressure differs from holding pressure and back pressure, why pressure affects molded part quality, and how JeekMould reviews pressure-related risks before tooling and during mold trials.
What Is Injection Pressure in Injection Molding?
Injection pressure is the force used to push molten plastic from the injection unit into the mold cavity during the filling stage. The material must travel through the nozzle, sprue, runner, gate, and cavity before the part is filled. Each section creates resistance. The machine must generate enough pressure to move the melt through that path before the plastic cools and freezes.
A simple part with thick walls, short flow length, and an easy-flow material may need moderate pressure. A thin-wall housing, long flow path, small gate, glass-filled resin, or high-viscosity material may need much higher pressure to fill properly.
Injection pressure is not the same thing as clamping force. Injection pressure pushes plastic into the mold. Clamping force keeps the mold closed against that pressure. If injection pressure rises beyond what the mold and machine setup can support, flash, parting line opening, or dimensional variation may appear.
Why Injection Pressure Matters for Molded Part Quality
Injection pressure affects whether the plastic fills the cavity completely and whether the molded part can meet cosmetic, dimensional, and functional requirements. A pressure setting that is too low may create short shots, weak ribs, poor surface replication, incomplete details, or weak weld lines. The part may look close to complete but still fail because small features did not fill fully.
A pressure setting that is too high can create a different set of problems. Excessive pressure can force material into the parting line, causing flash. It can also increase molded-in stress, especially in stiff or clear materials such as PC, PMMA, or PS. In some cases, high pressure hides a design issue for a short time but makes the process window narrow and unstable.
Good pressure control is not about using the highest possible pressure. The goal is to fill the cavity consistently, pack the part properly, protect the mold, and avoid unnecessary stress in the plastic.
Injection Pressure vs Holding Pressure vs Back Pressure
Injection molding uses several pressure-related settings. These terms are connected, but they do not happen at the same stage of the molding cycle.
| Pressure Type | When It Happens | Main Purpose | Main Quality Effect |
|---|---|---|---|
| Injection pressure | Filling stage | Push molten plastic into the cavity | Filling, short shots, flash, weld lines, surface replication |
| Holding pressure | Packing stage | Compensate shrinkage before gate freeze | Sink marks, shrinkage, dimensions, part weight |
| Back pressure | Plasticizing stage | Control screw recovery and melt consistency | Mixing, color stability, melt density, bubbles, shot consistency |
Injection pressure controls the filling stage. Holding pressure works after the cavity is mostly filled and helps compensate for shrinkage while the gate is still open. Back pressure happens before the next shot, when the screw recovers and prepares the melt.
This difference matters because a defect may look like an injection pressure problem when the real cause is holding pressure, gate freeze, venting, or material plasticizing. A short shot may involve injection pressure and filling resistance. A sink mark near a boss may involve holding pressure and gate freeze. Color streaking or poor melt consistency may involve back pressure and screw recovery.
How Injection Pressure Affects Filling and Short Shots
Short shots happen when the molten plastic does not completely fill the cavity. Low injection pressure can be one reason, but the cause is rarely pressure alone.
A part may need more pressure when the wall is thin, the flow path is long, the gate is too small, the material viscosity is high, or the mold temperature is low. The plastic loses heat as it flows. If the material cools too much before reaching the end of the cavity, pressure demand rises quickly. Ribs, thin edges, small clips, and distant corners are common places where filling problems appear first.
Increasing injection pressure may help in some cases, but it should not be treated as the only fix. If the gate is undersized, the venting is poor, or the wall thickness is too thin for the flow length, the process may still remain unstable. The better approach is to review the part geometry, gate location, runner design, material, mold temperature, and venting together.
A well-designed mold should not need extreme injection pressure just to fill the part. When a process depends on very high pressure, the production window is usually narrow.
How Too Much Injection Pressure Causes Flash and Mold Stress
High injection pressure can force plastic into small gaps at the parting line, shutoffs, slides, inserts, or worn mold surfaces. This creates flash. Flash may look like a minor cosmetic issue at first, but it often points to a deeper process or tooling problem.
Flash can happen when injection pressure is too high, clamping force is too low, the parting line is worn, the mold is not closing properly, or vent depth is not controlled. If the mold opens slightly during filling or packing, plastic can escape into areas where it should not go.
Too much pressure can also stress the mold. Repeated high-pressure filling can increase wear on shutoff areas, slides, lifters, and parting line surfaces. If the process relies on excessive pressure to fill the part, the mold may produce acceptable samples but struggle in stable production.
A correct pressure setup should fill the part without forcing the mold to operate at the edge of its mechanical limit.
How Injection Pressure Affects Surface Finish and Flow Marks
Surface quality depends on pressure, injection speed, melt temperature, mold temperature, material drying, gate design, and cavity surface condition. Injection pressure alone does not decide the finish, but pressure plays an important role in how well the melt contacts and replicates the cavity surface.
If pressure is too low, the plastic may not press firmly into the mold surface. This can lead to poor gloss, weak texture replication, hesitation marks, or visible flow marks. Thin sections and long flow paths are more sensitive because the flow front loses heat quickly.
If pressure is too high, the part may fill aggressively and create molded-in stress, flash, jetting, or burn-related problems when venting is poor. Clear parts and cosmetic housings are especially sensitive because stress and flow disturbance can show up visually.
A better surface finish usually comes from balanced filling, proper gate design, good venting, stable material temperature, and controlled pressure rather than pressure alone.
What Is Holding Pressure in Injection Molding?
Holding pressure, also called packing pressure, is applied after the cavity is filled. At this point, the machine continues to push material into the cavity while the plastic cools and shrinks. This stage matters because plastic volume decreases as the part cools.
Holding pressure is especially important around thick sections, bosses, ribs, pads, and areas with higher shrinkage. If the gate is still open, holding pressure can continue feeding material into the cavity to make up for shrinkage. Once the gate freezes, additional pressure can no longer enter the part.
That is why holding pressure and gate freeze time are closely connected. If holding pressure is removed too early, or if the gate freezes before enough material is packed in, the part may develop sink marks, voids, low weight, or undersized dimensions.
How Holding Pressure Controls Sink Marks, Shrinkage, and Dimensions
Holding pressure helps control the final molded part after filling is complete. Injection pressure fills the cavity. Holding pressure controls what happens as the plastic begins to cool and shrink.
If holding pressure is too low, thick areas may shrink inward and form sink marks or voids. The final part size may also be smaller than expected. If holding pressure time is too short, the part may look filled but still lose size after ejection.
If holding pressure is too high, the part may become overpacked. Overpacking can create molded-in stress, difficult ejection, part sticking, parting line stress, or dimensions that shift in the opposite direction. Some parts may also show higher internal stress near gates or thick sections.
For parts with tight tolerance requirements, holding pressure can be just as important as initial injection pressure. Stable dimensions usually require proper filling, correct transfer point, suitable holding pressure, enough holding time, and consistent cooling.
What Is Back Pressure in Injection Molding?
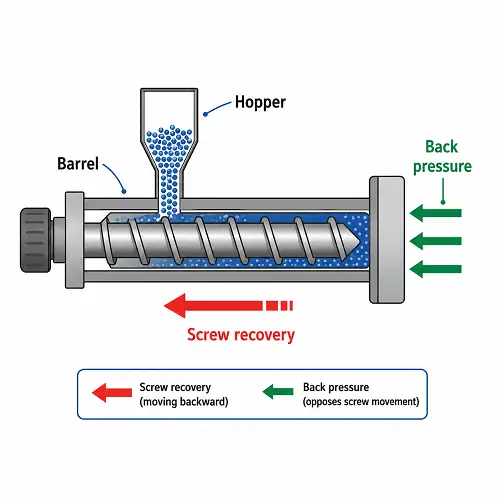
Back pressure is applied during screw recovery, not during cavity filling. After one shot is injected, the screw rotates and moves backward to prepare material for the next shot. Back pressure resists this backward movement.
This resistance helps compact the melt, improve material mixing, and make the shot more consistent. Back pressure can also improve color dispersion when colorants or masterbatch are used. It helps reduce unmelted pellets, poor mixing, and inconsistent melt density.
Back pressure is not used to push plastic into the cavity. That is injection pressure. Back pressure prepares the melt before injection begins. Because of that, back pressure mainly affects melt quality and shot consistency rather than direct cavity filling.
How Back Pressure Affects Melt Quality and Material Mixing
A moderate amount of back pressure can help improve melt uniformity. The screw works the material more consistently, which can improve color mixing, material density, and shot-to-shot stability. This can be useful for cosmetic parts, color-matched parts, filled materials, or parts where appearance consistency matters.
Too little back pressure may lead to poor mixing, color streaks, trapped air, inconsistent shot size, or unstable melt quality. The part may show surface variation even when the mold and injection pressure look reasonable.
Too much back pressure can create another problem. It can increase shear heat, extend screw recovery time, degrade heat-sensitive materials, and lengthen the cycle. Some plastics are more sensitive to shear and residence time than others. Clear materials, flame-retardant grades, PVC, and some engineering plastics need careful processing control.
Back pressure should be treated as a melt preparation setting. If a part does not fill, the first items to review are usually injection pressure, material temperature, flow resistance, gate design, wall thickness, venting, and mold temperature. Back pressure may improve melt quality, but it should not be used as a substitute for proper mold and process design.
What Causes High Injection Pressure?
High injection pressure usually means the machine needs more force to push plastic through the flow path. The cause may be in the material, part design, mold design, or processing conditions.
Common causes include thin wall sections, long flow length, small gates, narrow runners, low melt temperature, low mold temperature, high-viscosity material, poor venting, sharp flow restrictions, and complex cavity geometry. Glass-filled materials and high-performance engineering plastics can also require higher pressure because the melt does not flow as easily as general-purpose resins.
High pressure is not always bad. Some parts naturally need higher pressure because of their design and material. The concern is whether the required pressure is reasonable and stable. If the process needs very high pressure just to fill the part, the design may have a narrow molding window.
A good mold review should identify pressure risks before tooling. Thin walls, long flow paths, small gates, and poor venting are easier to correct before steel is cut.
What Causes Low Injection Pressure or Poor Filling?
Poor filling is often described as low injection pressure, but the actual issue may be pressure loss. The machine may show a high pressure value, while the pressure reaching the far end of the cavity is still not enough.
Pressure can be lost through the nozzle, sprue, runner, gate, and flow path. A small gate, long runner, cold mold, low melt temperature, or restrictive feature can reduce the pressure that reaches the final fill area. Poor venting can also stop the melt front because trapped air has nowhere to escape.
Incomplete ribs, weak clips, unfilled corners, and short shots often appear at the end of flow. These symptoms do not always mean the machine pressure setting is too low. They may mean the plastic cannot move through the mold efficiently.
Before raising pressure, the team should check melt temperature, mold temperature, gate size, runner design, venting, wall thickness, injection speed, and material drying.
How Material, Wall Thickness, and Gate Design Change Pressure Settings
Different materials require different pressure conditions. Easy-flow materials such as some PP grades may fill at lower pressure. Higher-viscosity materials such as PC, PMMA, POM, PA, and glass-filled resins may need more pressure, depending on grade and part geometry.
Wall thickness has a major effect. Thin walls freeze quickly, which increases pressure demand. Thick walls may fill more easily, but they often need careful holding pressure to control sink marks, voids, and shrinkage.
Gate design also changes pressure behavior. A gate that is too small can restrict flow, increase pressure loss, and freeze too early. A gate that is too large may improve packing but leave a larger gate mark or affect appearance. Gate location matters because the flow length from the gate to the farthest area controls how much pressure is needed.
Pressure settings should not be chosen without looking at part design. Material, wall thickness, gate design, flow length, venting, and mold temperature all work together.
Common Injection Pressure Problems and How to Troubleshoot Them
Pressure-related defects need a structured review. Changing one machine setting without checking the mold and part design can create a new problem somewhere else.
| Problem | Possible Pressure-Related Cause | What to Check |
|---|---|---|
| Short shot | Injection pressure too low or flow resistance too high | Gate size, melt temperature, mold temperature, venting, wall thickness |
| Flash | Pressure too high or clamping force too low | Parting line, clamp tonnage, mold wear, shutoffs |
| Sink marks | Holding pressure too low or gate freezes too early | Packing time, gate size, thick sections, cooling |
| Burn marks | Trapped air or excessive shear | Venting, injection speed, pressure peak, flow restrictions |
| Flow marks | Poor pressure transfer or unstable flow front | Gate location, material temperature, mold temperature, injection speed |
| Unstable dimensions | Poor packing or pressure variation | Holding pressure, cooling stability, material batch, gate freeze |
| Bubbles or poor mixing | Back pressure or plasticizing instability | Screw recovery, drying, back pressure, melt temperature |
The table is only a starting point. Real troubleshooting should consider the part, mold, material, and machine together. A short shot may be caused by low pressure, but it can also come from poor venting or a gate that is too small. Flash may come from excessive pressure, but it can also come from insufficient clamping force or mold wear.
How JeekMould Reviews Pressure Conditions Before and During Mold Trial
JeekMould reviews pressure behavior before tooling and during mold trial. Before mold manufacturing starts, the team can check the CAD model for thin walls, long flow paths, small gates, thick bosses, difficult materials, and areas where venting may be limited. These details often decide whether the part will fill smoothly or require a narrow pressure window during production.
During mold trial, JeekMould checks how the part fills, where the flow front slows down, whether short shots appear, whether the parting line flashes, and whether pressure changes affect dimensions or cosmetic surfaces. Holding pressure, gate freeze, sink marks, shrinkage, venting, cooling stability, and ejection behavior are reviewed together because pressure problems rarely come from one setting alone.
For customers, this early review is useful because pressure-related defects are often expensive to fix after the mold is built. A small gate, thin wall, poor venting area, or long flow path can sometimes be adjusted before tooling. Once steel is cut, the same issue may require mold modification, extra sampling, or a less stable molding process.
If a part has thin walls, long flow paths, cosmetic surfaces, small ribs, tight dimensions, or uncertain material behavior, JeekMould can review the CAD model before tooling and identify possible filling, packing, venting, and pressure risks.
FAQ: Injection Pressure in Injection Molding
What is injection pressure in injection molding?
Injection pressure is the pressure used to push molten plastic into the mold cavity during the filling stage. It helps the material flow through the runner, gate, and cavity before the plastic cools and freezes.
What happens if injection pressure is too low?
If injection pressure is too low, the part may not fill completely. Common results include short shots, weak ribs, incomplete details, poor surface replication, and weak weld lines.
What happens if injection pressure is too high?
If injection pressure is too high, the mold may flash at the parting line, the part may develop molded-in stress, and the mold may experience extra wear. High pressure can also make the process less stable if the mold or clamping force cannot support it.
What is the difference between injection pressure and holding pressure?
Injection pressure fills the cavity. Holding pressure works after filling to compensate for shrinkage before the gate freezes. Injection pressure mainly affects filling, while holding pressure mainly affects sink marks, shrinkage, and dimensional stability.
What does back pressure do in injection molding?
Back pressure is applied during screw recovery before the next shot. It helps improve melt consistency, material mixing, color dispersion, and shot stability. Too much back pressure can increase shear heat, extend recovery time, or degrade sensitive materials.
Does higher injection pressure always improve part quality?
No. Higher pressure may help fill a difficult part, but too much pressure can cause flash, stress, venting problems, or mold wear. Good part quality comes from balanced pressure, proper gate design, material control, venting, cooling, and clamping force.
Conclusion
Injection pressure has a direct effect on molded part quality, but it should not be treated as a standalone machine setting. Filling, flash, short shots, surface finish, sink marks, shrinkage, and dimensions are all connected to pressure, material behavior, wall thickness, gate design, venting, clamping force, holding pressure, back pressure, and cooling stability.
A stable injection molding process uses enough pressure to fill the part without forcing the mold beyond a safe process window. Holding pressure must then pack the part correctly, and back pressure must prepare a consistent melt for the next cycle. When these settings are reviewed together, the mold is easier to run and the final part is more reliable.
Injection pressure problems usually become expensive after the mold is already built. JeekMould can review wall thickness, gate layout, flow length, venting, material choice, and pressure-related molding risks before tooling starts. Upload your CAD files for injection molding DFM feedback, pressure-risk review, and quotation.