In injection molding, one of the easiest things to misunderstand is not the mold itself, but the sample stages that come after the tool is built. A project may move from T0 to T1 and then to T2, yet those labels do not mean much unless it is clear what each stage is actually trying to prove. A molded part can look acceptable in one trial and still reveal major problems in the next. A sample can come out of the mold successfully and still be far from ready for production. That is why sample stages matter so much. They are not just internal labels. They are checkpoints that show whether the mold, the process, and the part design are moving in the right direction.
This is also where confusion usually starts. One team may treat T0 as an internal mold check, while another may use T1 as the first formal sample stage for review. Some projects move through the stages quickly with only small adjustments. Others need several rounds because the first samples expose issues with shrinkage, warpage, flash, assembly fit, or cosmetic appearance that were not obvious in CAD. The labels stay simple, but the meaning behind them depends on what is being checked and what still needs to be corrected.
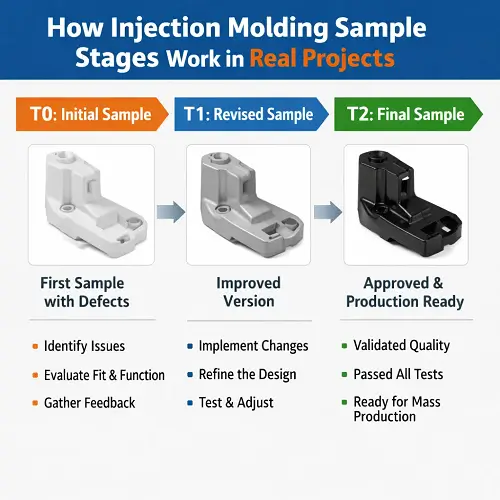
That is why T0, T1, and T2 should not be read as fixed milestones in isolation. In real projects, they are part of the tool development process. T0 usually answers whether the mold can run and produce usable parts at all. T1 is often the first stage where the part is judged more seriously against drawing requirements, appearance expectations, and assembly needs. T2 usually shows what happened after the first round of mold changes or process corrections. Once those stages are understood this way, the sample flow becomes much easier to read. Instead of seeing three labels, it becomes easier to see a pattern: first the mold runs, then the problems become visible, then the direction of correction starts to show.
What Do T0, T1, and T2 Mean in Injection Molding?
T0, T1, and T2 are sample-stage labels used during mold development, but they are easier to understand when they are viewed as project checkpoints rather than fixed definitions. In simple terms, T0 is usually the first early mold trial, T1 is the first serious review stage for the molded part, and T2 is the follow-up stage after changes have been made. That is the practical meaning most teams care about.
The reason these stages matter is that a new mold rarely goes straight from steel cutting to stable production without learning anything along the way. Even when the part design looks clean and the DFM review seems solid, the first molded parts still have to prove that filling, cooling, ejection, shrinkage, appearance, and fit are behaving as expected. The sample stages are there to expose what CAD could not fully confirm.
It also helps to understand that the labels themselves are not used in exactly the same way everywhere. Some suppliers keep T0 fully internal. Some use T1 for the first meaningful parts sent out for review. Others may use the labels with slightly different timing. That variation is normal. What matters more than the label is the purpose of the stage. Is the team checking whether the tool runs, whether the part meets the drawing, or whether the last round of corrections actually worked? Once that is clear, the sample stage becomes much easier to interpret.
Why Injection Molding Sample Stages Matter Before Production
A mold can produce parts and still not be ready for production. That is the main reason sample stages matter. A first shot coming out of the mold does not automatically mean the part is dimensionally stable, cosmetically acceptable, or ready to assemble with mating components. The tool still has to prove itself under real molding conditions.
That proof happens in layers. One stage may reveal that the mold fills and ejects correctly but still needs changes in venting or cooling. Another may show that the part is close dimensionally but not close enough in assembly. A later stage may confirm that the steel change fixed one problem while exposing a different one somewhere else. None of that is unusual. In fact, that is exactly why the stages exist.
Without staged review, it becomes much harder to tell whether a problem belongs to process tuning, mold modification, or part design. A warped housing, a flashing shut-off, a cosmetic line on a visible face, or a snap-fit that turns white under load all mean different things depending on when they appear and how consistent they are from sample to sample. The value of T0, T1, and T2 is that they give the project a structured way to read those signals before large quantities are made.
What Is a T0 Sample in Injection Molding?
A T0 sample is usually the first early mold trial part produced from a new tool. At this stage, the main question is not whether the molded part is ready for approval. The main question is whether the mold can run and produce usable parts at all.
That means the focus is often on mold behavior as much as part quality. Does the cavity fill completely? Does the part eject cleanly? Are the sliders, lifters, ejectors, and cooling lines working the way they should? Is there obvious short shot, drag, sticking, severe flash, or release trouble? These are the kinds of questions that often matter most at T0.
A T0 sample can still be useful for rough dimensional checks and early visual review, but it is usually too early to treat it like a final benchmark. At this point, the tool is proving basic function. The part may already look promising, but the real value of T0 is that it shows how the mold behaves under actual molding conditions for the first time.
What Is a T1 Sample in Injection Molding?
A T1 sample is usually the first stage where the molded part is reviewed more seriously against the drawing, the 3D model, the appearance standard, and the assembly requirements. This is often the point where the project stops asking only whether the tool runs and starts asking whether the part is actually moving toward production quality.
That is why T1 tends to be the most revealing stage. Critical dimensions are checked more closely. Appearance issues such as weld lines, sink, flow marks, gate witness, flash, or surface variation become more important. Fit with mating components starts to matter more. Functional features such as bosses, clips, sealing areas, threads, and snap details begin showing whether they are genuinely production-friendly or only looked safe in design review.
A T1 sample is often the first stage where the project’s real problems become visible in a useful way. That does not make T1 a failure stage. It makes it the stage where the mold and part are finally being judged seriously enough to show what still needs work. Some T1 samples come out very close to final. Others clearly point toward steel changes, venting work, dimensional correction, or additional process tuning. Either way, T1 usually gives the clearest picture of where the project actually stands.
What Is a T2 Sample in Injection Molding?
A T2 sample usually comes after the first meaningful round of changes to the mold, the process, or both. By this stage, the project is no longer only identifying problems. It is checking whether the earlier judgment was correct and whether the chosen corrections moved the part in the right direction.
This is what makes T2 so useful. A T0 sample may show whether the mold runs. A T1 sample often shows what is wrong. A T2 sample shows whether those problems were really understood. If a steel-safe dimension was adjusted, T2 shows whether it moved far enough. If a venting change was made, T2 shows whether the cosmetic issue improved the way the team expected. If an assembly issue was blamed on warp, T2 reveals whether the correction actually improved fit or simply shifted the distortion.
A strong T2 sample often means the project is converging. A weak T2 sample usually means the earlier analysis was incomplete, too optimistic, or aimed at the wrong root cause. That is why T2 says more about project maturity than many people expect. It is not just another set of molded parts. It is the first clear test of whether the correction path makes sense.
What Gets Checked During T0, T1, and T2 Sample Stages?
Each stage should answer a different set of questions. Without that discipline, sample review quickly becomes messy and conclusions become less reliable.
At T0, the main focus is usually mold function. That includes fill behavior, short shot risk, flash tendency, ejection, cooling response, and basic part release. A rough dimensional look can still be helpful, but the bigger issue is whether the mold is running in a stable enough way to move forward.
At T1, the inspection becomes much more serious. Critical dimensions, tolerance-sensitive features, cosmetic appearance, assembly fit, functional details, shut-off areas, sealing surfaces, and material behavior all need closer attention. This is often the stage where the difference between a moldable part and a production-viable part becomes obvious.
At T2, the part still needs full review, but the real emphasis shifts. Now the question is whether the known issues from the earlier stage were fixed correctly. A T2 sample is much more useful when it is compared against the original problem list than when it is judged in isolation. It should show whether the previous decisions were right, not just whether the part looks acceptable on its own.
Process Adjustment vs Mold Modification: What Sample Stages Can Tell You
One of the most important judgments in sample-stage review is deciding whether a problem belongs to process adjustment or mold modification. That decision affects schedule, cost, and project confidence.
Some issues are often process-driven. Slight surface variation, certain filling behaviors, limited flash, and some dimensional movement can sometimes improve with better control of melt temperature, mold temperature, packing, cooling time, fill speed, or cycle stability. That does not mean process can solve everything, but it does mean the first answer should not always be to change steel.
Other issues point more directly toward mold work. If a steel-safe dimension is clearly out and cannot be corrected through normal process control, if venting is inadequate, if a shut-off is unstable, if gate behavior is wrong for the geometry, or if a feature simply cannot perform as designed under real molding conditions, process adjustment alone will rarely solve the problem. Trying to force a geometry problem through machine settings often creates an unstable result instead of a real fix.
This is where sample stages become especially useful. The molded parts do not just show defects. They show patterns. Those patterns help determine whether the next step belongs at the press, in the mold shop, or back in the design review.
T0 vs T1 vs T2: How Sample Stages Move Forward in Real Projects
Real projects do not always move neatly from one stage to the next with a single lesson at each step. Sometimes T0 is rough but informative, T1 improves quickly, and T2 is mostly confirmation. Sometimes T0 looks acceptable, T1 exposes more serious fit or appearance issues than expected, and T2 becomes much more important than originally planned.
The pace depends on the mold complexity, the part geometry, the resin behavior, the cosmetic requirement, and how much was already anticipated in DFM. A simple internal bracket may move through sample stages with few surprises. A visible housing with shut-offs, clips, bosses, sealing features, and cosmetic surfaces usually learns much more from each stage because there are more ways for the real molded result to differ from what looked acceptable in design.
The most useful way to read the sequence is not as three fixed labels, but as a development rhythm. T0 should teach something about tool function. T1 should teach something about real part quality and fit. T2 should teach whether the correction path is actually working. Once the stages are viewed that way, the flow becomes much more practical and much easier to explain inside a real project.
Common Mistakes When Reviewing Injection Molding Trial Samples
One common mistake is expecting T1 to look like a finished production part in every respect. Some T1 samples do get close, but many are still part of the learning process. Judging them as if the project has already finished often leads to the wrong pressure and the wrong decisions.
Another mistake is assuming every visible issue means the mold needs immediate steel work. Some sample-stage problems really do improve with better process control. Jumping to mold modification too early can waste time and make the tool less stable, not more stable.
The opposite mistake also happens. A clearly structural or tooling-driven issue may be treated as a process problem for too long. That leads to repeated machine adjustments without solving the real cause. By the time it becomes clear that the mold needs modification, the schedule has already been stretched.
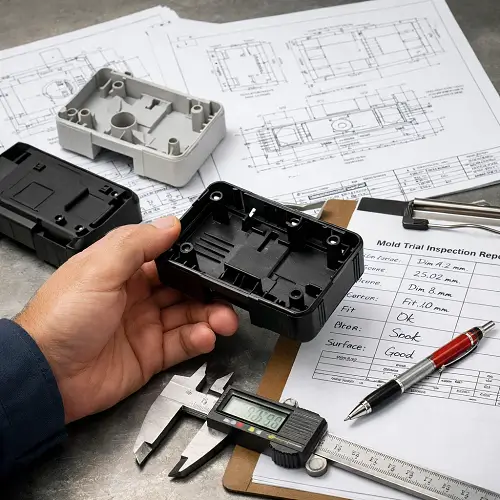
There is also a more basic review mistake: checking samples one by one without checking them in the way they will actually be used. A housing half may look acceptable alone and still show fit, warp, or latch issues once assembled. A boss may measure correctly and still fail under screw load. A cosmetic surface may seem fine under one light condition and fail under another. Trial samples only become meaningful when they are reviewed in the same context the final part will face.
What Should Be Approved Before Moving Toward Production?
Approval should mean more than simply having molded parts in hand. It should mean the mold, the part, and the process are all behaving in a way that supports the next stage of the project with reasonable confidence.
That usually requires more than one good-looking sample. Critical dimensions need to be stable enough for the project goal. Appearance needs to be judged on the surfaces that actually matter. Assembly should reflect real use conditions, not only a loose bench check. Functional features such as clips, threads, bosses, sealing areas, and interfaces should be reviewed in the same way they will be used later. If any of those are still uncertain, the project may still be learning even if the sample stage label sounds mature.
This is one reason good mold development is rarely about chasing one perfect-looking shot. It is about building confidence that the tool and process are moving toward repeatable production behavior.
Conclusion
T0, T1, and T2 are not just sample labels. They are part of how an injection molding project reveals its real condition. T0 usually shows whether the mold can run and produce usable parts. T1 is often where dimensions, appearance, fit, and function are judged more seriously for the first time. T2 usually shows whether the chosen corrections actually moved the project in the right direction.
When those stages are understood properly, sample review becomes much more useful. A rough early sample is no longer confusing if it is clear what that stage was meant to validate. A later sample becomes easier to judge because the comparison is not only against the CAD model, but also against the problem list from the previous stage. That is how trial samples work in real projects. They do not only produce parts. They produce information.
If a new mold is moving toward trial and the part includes tight tolerances, visible cosmetic surfaces, assembly-sensitive features, or steel-safe dimensions, it is worth reviewing the design and sample expectations before the next stage begins. Send your drawings to JeekMould for a DFM review and quote if the goal is to reduce trial-stage surprises and move the mold toward a more practical production result.
FAQ
What is a T0 sample in injection molding?
A T0 sample is usually an early mold trial sample used to confirm that the tool can run, fill, eject, and produce basic parts. It is often more focused on mold function than on final approval.
What is a T1 sample in injection molding?
A T1 sample is usually the first stage where the molded part is reviewed more seriously for dimensions, appearance, fit, and function. It often exposes the most useful early problems in the project.
What does T2 mean in injection molding?
T2 usually refers to the next sample stage after the first meaningful round of corrections. It is used to confirm whether mold changes or process adjustments actually improved the part in the right way.
Are T0, T1, and T2 always defined the same way?
Not always. Different suppliers and project teams may use the labels a little differently. The more useful approach is to understand what each stage is supposed to validate in that project.
What should be checked before approving a trial sample?
Key dimensions, cosmetic appearance, assembly fit, functional features, sealing areas, and overall part stability should all be reviewed. The sample should be judged in the same context the final part will actually be used.