Snap-fit joints look simple in CAD, which is exactly why they get underestimated. A small latch detail on the screen can turn into one of the most troublesome areas in an injection molded part once tooling starts. The clip may turn white during assembly, crack at the base after only a few test cycles, or require so much force that the housing bends before it closes. Sometimes the part locks, but the mold suddenly needs side actions the product team never expected. In other cases, the latch works mechanically but leaves sink marks or print-through on the visible surface.
That is usually the point where customers realize the snap-fit was never just a small hook. It was a spring feature, a tooling feature, and an assembly feature all at once.
Most teams use snap-fits for good reasons. They want to remove screws, speed up assembly, reduce part count, clean up the outer appearance, and avoid extra hardware. All of that makes sense. But a snap-fit only saves time and cost when the geometry, material, mold direction, and wall structure are working together. If those things are not aligned early, the latch that was supposed to simplify the product often becomes the detail that creates rework, steel changes, or unstable assembly.
Why customers use snap-fits instead of screws
In real product development, people usually do not search for snap-fit design because they are interested in latch theory. They search because they are trying to make a housing easier to assemble or cleaner in appearance. A screwless enclosure looks better, goes together faster, and can reduce the number of separate components. For consumer products, that can improve the user experience. For electronic housings, it can simplify assembly on the production line. For some products, it also lowers BOM cost and removes secondary fastening operations.
The problem is that a snap-fit only stays “cheap” when it behaves correctly in production. A poorly designed latch can create the opposite result. Instead of saving cost, it can push the mold toward slides or lifters, increase rejection risk because of stress whitening or sink, or make assembly slower because the closing force becomes too high and inconsistent. That is why customers looking into snap-fits are usually trying to answer a very practical question: will this feature actually simplify the product, or is it going to create a problem later?
Why a snap-fit that looks fine in CAD can still fail in production
This is where a lot of housing projects get into trouble. On the CAD model, the clip may appear compact, strong, and easy to place. The hook engages the mating edge, the section view looks acceptable, and the enclosure seems clean. But once the part is molded, the latch has to deal with real material behavior, real shrinkage, real cooling conditions, and real assembly force. That is when problems start to show up.
A beam that looked strong enough in CAD may actually be too short and too stiff for the amount of movement required. A root that looked harmless in section may turn into a crack initiation point after molding. A wall that was thickened to “support” the clip may create sink on the cosmetic side and make the latch less forgiving at the same time. The locking undercut may face the wrong direction and suddenly force the tool into a more complicated opening strategy. A poor gate location can leave a weak knit line right at the base of the arm, which is the last place a snap-fit wants to be weak.
From the customer side, all of these issues feel like the same outcome: the snap-fit does not work the way it should. From the mold side, they are very different problems, and the right correction depends on what is actually happening in the part.
What a good snap-fit should really do
A good snap-fit does more than just click into place. It should close without requiring excessive force, hold the mating part securely after engagement, release from the tool cleanly, and stay stable without whitening, cracking, or loosening too early. It also should not create avoidable mold complexity for a feature that was supposed to reduce cost in the first place.
That balance is where many designs fall short. Some latches hold well but are too harsh during assembly. Others close easily but do not retain properly. Some work on the part itself but create an expensive undercut condition in the mold. Looking only at whether the hook locks is too narrow. The better question is whether the latch still makes sense after molding, assembly, durability, appearance, and tooling cost are all considered together.
The snap-fit style most products actually use
For most plastic housings, the starting point is still the cantilever snap-fit. That is the style used in enclosure halves, battery covers, appliance panels, bezels, and many internal latch details. It fits naturally into rectangular parts and gives the design team enough freedom to tune how the latch behaves. Most of the real-world problems customers run into also happen with this style, which is why it deserves the most attention.
Other versions certainly have their place. Annular snap-fits are much more natural in round parts such as lids, caps, and collars. U-shaped snap paths can be very useful when the design needs more flexibility but the packaging space is tight. Torsional latch features can work in specialized products. Still, for most injection molded housings, the practical design conversation begins with the cantilever arm because that is where most failures, whitening issues, and tooling surprises show up.
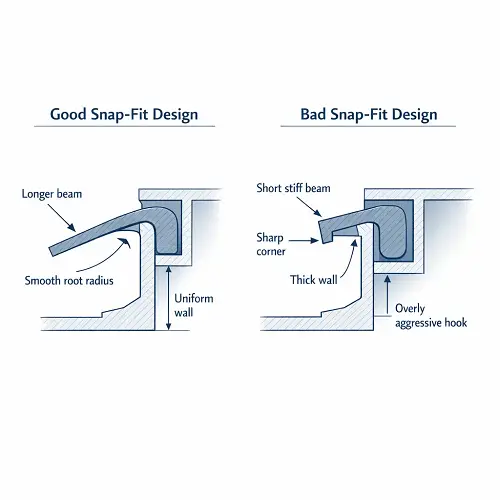
Why the beam matters more than the hook
Customers often focus on the hook first because it is the visible locking feature. In production, the hook is only part of the story. The beam is what determines whether the latch survives assembly in a controlled way.
If the beam is too short and too thick, the clip may still lock, but it usually does so by forcing too much strain into a very small area. That is why some latches feel harsh or overly stiff during closure. The problem is not always that the hook is too aggressive. More often, the spring section does not have enough working length to flex naturally. Once that happens, insertion force goes up, whitening becomes more likely, and the root of the arm starts carrying more stress than it should.
This is also why “make the hook bigger” is often the wrong correction. A latch that already closes too hard usually does not need more locking geometry. It needs a beam that works more like a spring and less like a rigid tab. In many cases, increasing effective beam length, softening the transition at the base, or changing how the clip travels during assembly produces a much better result than simply changing the head of the latch.
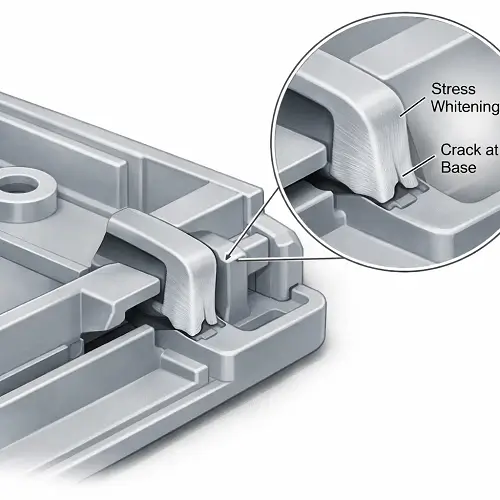
Why snap-fits crack or turn white during assembly
Most customers first notice a snap-fit problem when the latch starts whitening during closure or breaks near the base after a few test cycles. That is usually an early sign that the beam is being pushed too hard in the wrong area. The crack almost never starts at the visible tip of the hook. It usually begins at the root of the arm, where bending stress is highest and poor geometry becomes obvious very quickly.
A sharp transition at the base makes the problem worse. So does a beam that is too short for the required movement. A resin that is too stiff or too notch-sensitive for the clip geometry can push the design even closer to failure. In some parts, the latch does not break immediately, but the whitening shows that the strain level is already too high for comfortable production use. Once that happens, the part may still “work,” but it is already telling you that the design margin is too tight.
This is why whitening should not be treated as a harmless cosmetic issue. In many molded housings, it is the first visible warning that the snap-fit is not well balanced.
Why thickening the area around the latch often makes things worse
One of the most common instincts in plastic part design is to add more material around a latch because it feels safer. In injection molding, that often creates a different set of problems. A thick wall behind the snap arm cools more slowly, becomes less uniform, and usually makes the beam transition stiffer than it should be. On the visible side of the part, that extra mass can also show up as sink or print-through.
So while the designer may think the clip is being reinforced, the actual result is often a latch that is harder to flex, more likely to stress whiten, and more likely to create cosmetic defects. A better approach is usually to control the nominal wall and support the feature more intelligently. In many products, a clean beam transition and properly sized ribs do more for performance than simply building a heavy block of plastic behind the arm.
This is especially important for consumer housings and visible outer shells. A latch that functions mechanically but ruins the surface appearance is still a bad design from the customer’s point of view.
Why material choice changes the whole behavior of the snap-fit
A latch that works in one resin does not automatically work in another. This is one of the easiest ways a design drifts into trouble between concept and production. A team may evaluate the clip early in a more forgiving resin, then switch to a stiffer production material because the housing needs better rigidity or dimensional stability. The CAD geometry stays the same, but the assembly feel changes completely.
That is why the phrase “stronger material” can be misleading in snap-fit design. Snap-fits do not only need strength. They need controlled flex and good recovery. A stiffer material can make the housing body feel more solid while making the latch itself much less forgiving. Polypropylene, acetal, nylon, and glass-filled grades can all be used in products with snap-fits, but they do not tolerate the same beam geometry or the same level of strain. A clip that behaves reasonably in a flexible resin may become harsh or brittle once the material changes.
For customers, the important point is simple: the latch geometry and the resin choice should never be reviewed separately. If one changes, the other often needs to be revisited too.
Why some snap-fits quietly make the mold more expensive
This is the part many customers do not see until the tooling quote comes back. A latch may look like a small internal detail on the model, but if the locking undercut faces the wrong direction, the mold may need side actions, lifters, or more delicate shut-off features to release the part. That adds machining, moving components, maintenance risk, and usually cost.
The frustrating part is that the feature itself may not look complicated at all. The cost is not coming from the size of the hook. It is coming from how that hook sits relative to the mold opening direction. A small change in latch orientation, parting strategy, or relief geometry can sometimes remove that complexity entirely. That is why early DFM review matters so much with snap-fits. A feature that seems minor on the plastic part can have an outsized effect on tooling once steel is involved.
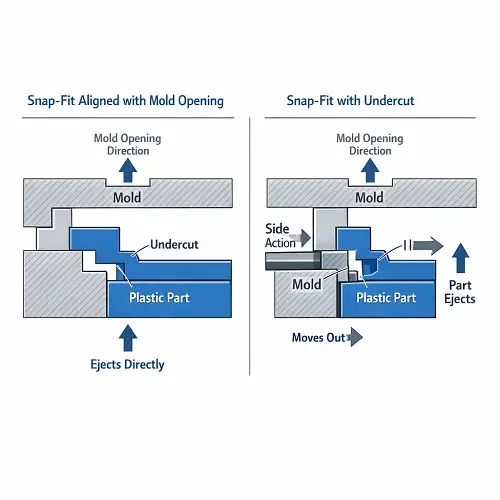
Why draft and ejection should be checked before the tool is built
Some snap-fit problems do not begin during assembly. They begin during ejection. If the clip walls are too straight, if draft is too small, or if the feature is dragging against the tool during release, the latch can already be carrying unnecessary stress before the operator ever touches it. That may show up as damaged edges, inconsistent feel, drag marks, or clips that behave differently from one cavity to another.
This is why a snap-fit should never be reviewed only as a product feature. It is a molded feature first. The hook and the mating edge may look correct in section view, but if the part does not release cleanly from the tool, the design is still not finished. It is much easier to fix that logic before steel is cut than after a mold trial reveals that the latch is fighting the tool every cycle.
Why gate location and flow pattern matter more than people expect
The latch root is already the most highly stressed part of the snap-fit, so it is a bad place to introduce weak flow conditions. If the melt front creates a knit line or hesitation near the base of the beam, the latch may become weaker exactly where it needs the most support. The clip may still form, and the part may still assemble, but the durability margin is lower than the CAD model suggests.
Cooling can create another layer of trouble. Heavy plastic around the latch root tends to cool differently from the surrounding wall, which can change fit, engagement depth, and assembly force. That is why a clip can feel inconsistent even when the geometry looks identical on paper. For real housing programs, the gate path and the latch behavior should be considered together. A section that looks fine in isolation may still be unreliable because the molding conditions are working against it.
What a typical T1 snap-fit problem looks like
A common housing project starts with a clean idea: remove visible screws and use internal snaps to close the enclosure. The CAD looks compact and efficient. The clips appear strong. The mold is built. Then the first trial parts arrive, and the latch becomes the first problem the team notices.
Sometimes the clip turns white as soon as the housing is closed. Sometimes it cracks at the base. In other cases, the housing can be assembled, but it takes far too much force, and the side walls begin to flex before the latch engages. At that stage, the design team often assumes the hook needs to be larger or more aggressive. In reality, that is often the wrong direction. The actual problem is usually in the beam length, the root transition, the surrounding wall mass, the material choice, or the molding direction.
This is why snap-fits should be reviewed before tooling release as a full DFM feature, not as a small detail left until the end. They are inexpensive only when they are solved early.
A more realistic way to review a snap-fit before tooling
A useful review goes beyond asking whether the latch engages. The better questions are more practical. Does the beam have enough working length for the required movement? Is the base of the arm too sharp? Is the surrounding wall making the beam stiffer than it should be? Will the chosen resin still behave acceptably once the production material is locked in? Does the undercut follow the mold opening direction, or is it quietly adding cost to the tool? Is the gate putting weak flow conditions near the beam root? Is this latch meant to be opened repeatedly, or only assembled once?
Those are the questions that actually reduce risk. They help the customer understand whether the snap-fit will still make sense after molding, assembly, service life, and tooling cost are all considered together.
Snap-fit design review checklist
| Review Item | What to Check | Common Risk |
|---|---|---|
| Beam length | Does the arm have enough working length to flex smoothly? | High assembly force, whitening, cracking |
| Root transition | Is the base of the snap too sharp or too abrupt? | Stress concentration and root failure |
| Wall thickness | Is there too much material behind the latch? | Sink, stiffness, cooling distortion |
| Material choice | Does the resin match the clip’s flex requirement? | Brittle closure or poor recovery |
| Mold direction | Can the latch release cleanly with the mold opening? | Slides, lifters, tooling cost |
| Draft | Is the feature easy to eject without dragging? | Damage during release, unstable feel |
| Gate location | Will the flow path weaken the latch root? | Knit-line weakness, inconsistent closure |
| Service condition | Will the latch be opened repeatedly or only once? | Wrong geometry for real product use |
What matters before you release a snap-fit design
The most important thing to remember is that a snap-fit should not be judged by whether it looks correct in CAD or whether it can lock once on a prototype. The real question is whether it still behaves properly after molding, after assembly, and after the product is used the way it was intended to be used.
That is why the best snap-fits often look less dramatic than the risky ones. They are not overly aggressive. They do not rely on brute force. They flex in a controlled way, release from the mold without unnecessary trouble, and hold the product together without becoming the part’s weakest feature. In good programs, that result comes from reviewing the clip as a spring, a molded feature, and a tooling decision all at the same time.
Conclusion
If you are using snap-fits to replace screws in an injection molded housing, the goal is not simply to make the part click together. The goal is to get a latch that assembles smoothly, holds securely, survives real use, and does not create extra mold cost or avoidable cosmetic defects along the way.
Most snap-fit failures come back to the same root causes. The beam is too short, the base is too sharp, the surrounding wall is too heavy, the chosen resin is less forgiving than the geometry requires, or the undercut creates mold complexity that was not obvious at the part-design stage. Those problems usually show up as whitening, cracking, unstable closing force, poor retention, or an unexpectedly expensive tooling solution.
A strong snap-fit rarely comes from making the hook more aggressive. It usually comes from better balance. The beam has to flex naturally, the root has to stay out of trouble, the wall structure has to remain moldable, and the latch has to work with the tool instead of against it. When those conditions are handled early, snap-fits can reduce hardware, speed up assembly, and make a plastic housing feel cleaner and better engineered.
If your design already includes internal clips, visible cosmetic walls, hidden undercuts, or repeated-service requirements, it is worth reviewing the snap-fit as a full DFM feature before tooling starts. JeekMould can review the latch geometry, wall structure, mold opening direction, and tooling risk early, before a small snap-fit detail turns into a larger mold correction.
FAQ
What is the best snap-fit type for injection molded housings?
For most rectangular housings, a cantilever snap-fit is usually the best starting point because it is easier to package into enclosure-style parts and easier to tune for assembly and retention.
Why does a snap-fit turn white during assembly?
Whitening usually means the latch is carrying too much strain during closure. The beam may be too short, the base may be too sharp, or the material may be too stiff for the amount of movement required.
Why do snap-fits increase mold cost?
They can increase tooling cost when the locking undercut does not follow the mold opening direction and the tool needs side actions, lifters, or more complicated shut-off details.
Can the same snap-fit geometry be used with different materials?
Not safely by default. Different resins behave very differently in flex, recovery, and notch sensitivity, so the latch design and the material choice should always be reviewed together.
What should be checked before tooling a snap-fit housing?
The main checks are beam length, root transition, wall thickness, material choice, draft, mold direction, gate location, and whether the latch is meant for repeated use or one-time assembly only.