
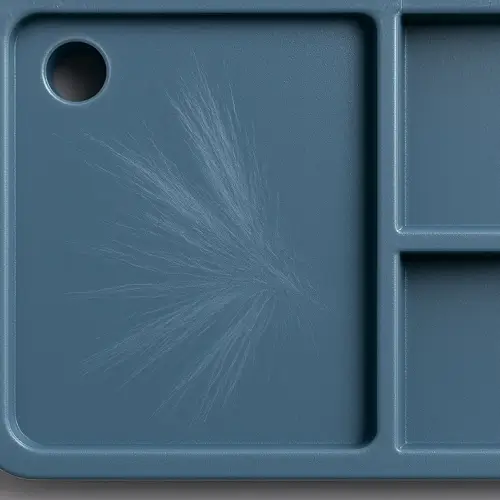
Splay marks, often appearing as silver streaks, splashes, or mica streaks, represent a common and deeply frustrating surface defect in injection molded components. These streaks typically radiate outward from the gate, strictly following the direction of the melt flow.
While the flaw is purely cosmetic on the surface, splay marks frequently signal underlying issues—primarily related to material quality, excessive moisture, or improper processing conditions—which can, in turn, compromise the component’s structural integrity. Does this type of surface flaw often appear in your high-gloss applications? For high-precision manufacturers like Jeek, eliminating these visible streaks is mandatory for delivering high-quality, aesthetically acceptable components.
Our initial approach must always be to distinguish the root cause: is the splay due to volatiles (moisture or chemicals) or excessive shear stress (heat/friction)?

What Are Injection Molding Splay Marks?
Splay marks are surface blemishes resulting from volatile gases trapped within the polymer melt. When the melt front rapidly advances into the mold cavity, these trapped gasses expand and burst upon meeting the relatively cooler mold surface, leaving behind the characteristic silver lines or splash patterns. “
These marks are strictly a surface phenomenon, meaning the defect lies on the outermost layer of the polymer, unlike bubbles or voids which are volume defects. The rapid pressure change during injection forces volatile pockets to instantaneously burst on the surface before they can dissolve or escape.
Understanding Splay Mark Characteristics
The fundamental cause determines the type of mark we observe. If the cause is insufficient drying of hygroscopic resins (like PC, Nylon, or ABS), the resulting steam causes a clear, silver-white mark—this is moisture splay and is overwhelmingly the dominant cause.
However, if the marks are caused by material degradation due to high friction, trapped air, or chemical volatiles, they may appear slightly yellowish or brownish, signaling excessive shear or localized burning. Regardless of the exact color, the distinction between these two primary types is crucial for accurate diagnosis.
Diagnosing the Root Causes in Processing
Our diagnosis begins with the material handling. Resins must be dried to extremely low residual levels (often $<0.02\%$), and if drying time or temperature is inadequate, the absorbed water vaporizes instantly in the hot barrel, leading directly to splay.
The first corrective action is always to verify the dryer’s performance and ensure proper resin conveyance.
Material Moisture and Drying Deficiencies
Beyond moisture, the most common factor is excessive shear heating. High friction generates localized overheating, degrading the polymer and releasing volatile gasses. Have you checked your screw RPM settings recently when facing splay?
This shear can be generated by setting the screw rotation speed (RPM) too high, utilizing excessive back pressure during plasticizing, or by inherent flow restrictions within the mold, particularly at small gates, narrow runners, or restrictive nozzle tips. It is also crucial to inspect the integrity of the screw and barrel; excessive wear here can create uncontrolled shear zones and hot spots.
Any of these conditions forces the viscous melt to rapidly deform, generating friction and heat, thus creating volatile byproducts that cause splay.
Temperature and Volatile Entrapment
Furthermore, improper temperature settings compound the issue; if the barrel temperature is set too high, degradation is accelerated, while a mold temperature that is too low can cause the melt front to freeze prematurely, forcing subsequent melt flow to push against the solidified layer, dramatically increasing shear stress.
Finally, we must consider entrapment of non-moisture air. If the initial injection speed is set too rapidly, the polymer acts like a piston, compressing the air ahead of the melt front.
If the mold’s venting system is inadequate, this compressed air is then forced back into the melt surface and flashes upon contact with the mold wall, resulting in splay marks that look similar to those caused by moisture. This requires a dedicated check of the mold design itself.
The Systematic Approach to Splay Elimination
A seasoned engineer addresses splay marks systematically, prioritizing the most likely culprits. Which diagnostic step do you usually perform first on your production floor?
Material Verification
The first critical step is Material Verification. We must immediately recheck and extend the drying time and ensure the dryer temperature is correctly set for the specific resin (e.g., $180^\circ C$ for PC). A reliable moisture analyzer should be used to confirm the residual moisture content is compliant; if the splay marks disappear upon confirming dry material, the diagnosis is complete. “
Target Melt Shear
If material verification fails to resolve the issue, the focus shifts to minimizing friction. The screw RPM and back pressure must be incrementally reduced to limit the thermal history imparted to the polymer.
Concurrently, slightly increasing the mold temperature ensures the polymer surface remains pliable longer, reducing the shear stress experienced by the melt front as it rubs against the cavity walls. Conversely, slightly reducing the barrel temperatures (especially the nozzle and front zones) can minimize overall polymer degradation.
Address Flow and Venting
If the streaks persist, we must confirm the flow profile is not the culprit. We must reduce the initial injection speed. A slower frontal velocity allows more time for any trapped air or volatiles to escape through the established mold vents before the surface freezes.
If speed adjustments offer no remedy, the defect is likely mold-bound, requiring an investigation into the venting design—deepening vents or adding them in suspect areas—or revising restrictive gate geometries to facilitate smoother, less stressful melt entry.
Quality Control Protocol at Jeek
At Jeek, components demanding the highest surface aesthetics, such as glossy housings, are subject to a rigid splay marks protocol. The initial diagnostic check is invariably the material drying status, verified by quantitative measurement.
Only after moisture is confirmed to be safely below the specification threshold (e.g., $<0.015\%$) do our engineers proceed with process parameter adjustments (screw speed, pressure, temperature).
Utilizing short-shot trials is also key; observing the inception point of the streaks in a partially filled mold can reveal exactly where the volatiles are accumulating and where the flow is generating the highest shear. This disciplined procedure ensures the root cause is quickly isolated—be it material, machine, or mold—thereby maintaining stable output and superior surface quality.
FAQs
What is the fastest way to determine if splay marks are caused by moisture?
The fastest way to confirm moisture is to perform a short-shot trial (also called a purge shot) using the suspect material. If the resulting melt exhibits bubbles, sputtering, or excessive frothing as it exits the nozzle, moisture is the root cause. The immediate solution is to verify the desiccant dryer performance and extend the drying time.
Can splay marks indicate actual structural weakness in the part?
Yes. While splay marks are primarily a surface defect, they indicate that either the polymer melt has been degraded by excessive heat (shear) or that there are significant pockets of trapped gas present in the flow. Both conditions compromise the material’s integrity, potentially leading to reduced mechanical strength and premature failure under stress, especially for critical components.
How do splay marks differ from flow marks (gate blush)?
Splay marks are caused by volatile gases or moisture flashing on the surface, leaving fine, silver streaks. Flow marks (or gate blush) are caused by the cold polymer melt hitting the cavity wall at high speed and rapidly freezing in a turbulent, fan-like pattern. Flow marks are solved primarily by slowing the initial fill speed, whereas splay requires addressing moisture, shear, or venting.Among injection molding defects, splay is one of the easiest to misread because it looks cosmetic at first, yet it often reflects deeper issues in material condition, shear history, or cavity venting.
Conclusion
Splay marks in injection molding are a clear signal of either volatile generation (dominated by insufficient drying) or excessive shear heating. Effective resolution mandates a systematic, tiered approach: prioritizing confirmation of material dryness, followed by careful optimization of shear-inducing parameters like screw speed and back pressure, and concluding with fine-tuning temperatures and mold venting. Do these steps align with the troubleshooting procedures in your facility? By rigorously controlling the presence of volatiles and managing melt flow stress, manufacturers can achieve and sustain a pristine, defect-free surface finish.
Ready to Eliminate Defects and Improve Yield?
If you are struggling with persistent splay marks, flow lines, or need expert analysis for your high-aesthetic molding projects, contact our engineering team today.